| Product/Service: | MySideline Manager |
| Permission Required: | NRL.com Account with Team Admin, Club Admin* or GameDay Admin access *For Teams playing "across Associations", you require Team Admin access |
The Match Management feature hosts all of the functionality required to help manage and streamline game-day operations, including scoring a match, managing halves & periods, managing interchanges, vest rotation (applicable age groups only), and confirming results.
Prior to the start of the match, it's important a scorer or match manager has been appointed, as only ONE (1) person needs to complete the scoring via MySideline Manager.
Expand each step for more information:
1. Selecting a Match
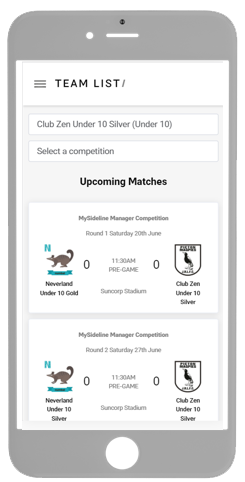
Step 1: Select 'Matches' from the menu
Step 2: Select the Match you would like to manage. For convenience, upcoming matches will be ordered first.
Note: To manage a match the status will need to be set to 'Pre-Game'. If the match status is set to 'Final' or 'Disputed' the match will be locked and can only be updated by the League Administrator.

2. Starting a Match
Step 1: Prior to starting a match it's important to confirm the correct match is selected by viewing the round number and date/time of the match. The connectivity icon will indicate whether your device is:
- Green (Synced): Connected and all match events are updated in the admin.
- Red (Offline): Not Connected, however, all match events when the connection is lost will still be saved locally and updated in the admin once connectivity is regained, meaning you can continue scoring even when you’re offline.

Step 2: Select Period 1 to start the match.
Depending on the competition type, the number of periods may differ. If the competition age group utilises the Dummy Half (DH) and First Receiver (FR) vests you will be given the option to record the players who have worn the vest each period. This is designed to help Coaches and Team Managers track and manage the vest rotation between players. This can be added either at the start of the period or by selecting the relevant period during the match.
3. Scoring a Match
Step 1: Once you have started the period you will be able to add scoring events. Select the 'Scoring' Tab.
Step 2: To add a scoring event, select the PLUS ( + ) icon next to the event that occurred, select the player from the list available, and enter the time of the event. Once submitted, the score will update according to the event selected.

Note: If you're unable to locate the player from the list available we recommend checking the team list to ensure they have been assigned. An option is also available in the player list to add an "Unknown" scorer.
Step 3: If an error is made it can be amended from the 'Feed' tab, which captures a list of all match events in chronological order (see #5 below). If you remove a scoring action because it was accidentally assigned to the wrong team or player, make sure to add the correct action from the scoring tab by clicking the + button.
4. Managing the Interchange
Step 1: Select the Interchange Tab
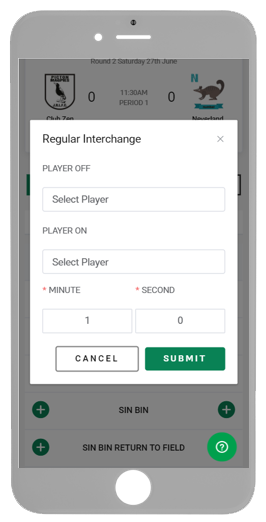
Step 2: To add an interchange event, select the PLUS ( + ) icon next to the event that occurred:
- Select the player leaving the field
- Select the player entering the field
- Enter the time and select SUBMIT to save the event.
- Note: In some events, such as a Sin Bin, you won't be required to select a player to enter the field.

Step 3: If an error is made it can be amended from the 'Feed' tab, which captures the list of match events in chronological order.
5. Match Activity Feed
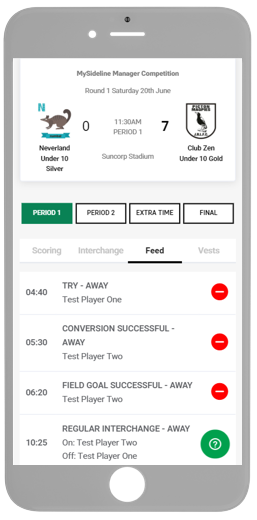
The Feed tab captures the list of recorded events and actions for the match.
Step 1: Select the Feed Tab
Step 2: If required, amendments can be made via the event feed by selecting the red MINUS ( - ) icon next to the event you would like to remove. Once selected, you will be required to confirm the change.
Note: All Match events (both scoring and interchange) will be captured in the feed and if permitted will be displayed in the Match Centres along with results on playrugbyleague.com and the MyLeague App.

6. Confirming the Result
Step 1: Once the game has concluded and all match events have been added you will need to set the match as final by selecting the 'Final' tab.
Step 2: Confirm the result with the opposing team manager.
If required, you can modify the scores prior to confirming the result.

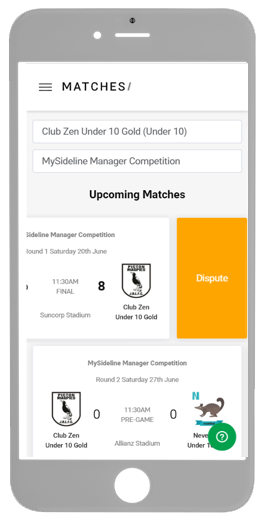
Note: Where required, the match can be disputed if the result can't be confirmed at the ground. A dispute can be submitted via the Match List by sliding the Match Card to the left, selecting the Dispute button and entering a dispute reason. A dispute option is also available on the Match Management screen by selecting the menu list in the top right-hand corner.

RELATED ARTICLES
MySideline Manager: Squad Management
MySideline Manager: Team Lists & Digital Cards
MySideline Manager: Injury Reporting
Was this article helpful?
That’s Great!
Thank you for your feedback
Sorry! We couldn't be helpful
Thank you for your feedback
Feedback sent
We appreciate your effort and will try to fix the article